3D Models in React Web Applications
In our industry, we often deal with large and high-resolution CAD models. However, they do not offer optimal performance for interactive use like in web applications. This is due to both the long loading time and poor performance due to the large file size. The high number of triangles and polygons as well as the deep model hierarchy also plays into this. It can be an innovative idea to use 3D models in your web application to navigate through a steel plant and allowing the user to select various parts to display metadata. Yet to have a polished user experience there are some steps you need to follow first.
In this article, I will describe how to build a web application, which contains an interactive 3D model. For the application we will use three.js to render the model and the React-three-fiber library to express three.js in JSX. The 3D model will be optimized and exported as a .glb file. The editing and optimization of the model will be done in Unity with the PiXYZ plugin.
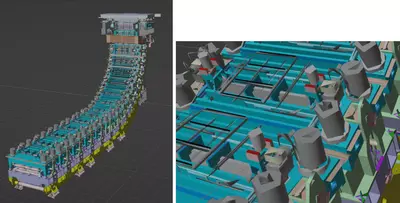
The caster model shown below will be used as an example.
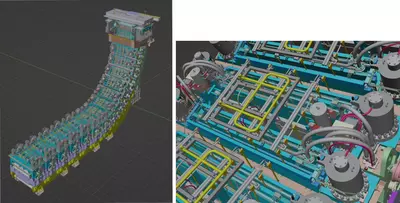
Props: 78.184 Objects, 9.398.013 Triangles, 6.497.054 Vertices, ~245Mb .glb File size
Optimization of the model
Unity and PiXYZ
It is also possible to simplify models with freeware tools like Blender. However, in our experience, PiXYZ runs better for more complex models.
Unity itself supports .fbx, .dae, .dxf and .obj files. To guarantee that the imported model operates well with the PiXYZ plugin, it is recommended to use the PiXYZ plugin import tool. With the PiXYZ import tool, it is possible to import almost any CAD file format, for example .step. For other supported file formats, see here.
The quality of the object meshes can be adjusted during the import process, which directly affects the triangle and vertex count. For the model in this example, the quality is set to “poor”. It is also possible to import the model with maximum quality and change the quality settings afterwards with the PiXYZ Mesh-Decimate tool, to check which level fits best as regards optics and properties.
After importing the model, the next step is to remove hidden covered objects, meshes or triangles with the PiXYZ Mesh-Remove hidden tool. The tool also provides for precision adjustment, while taking into consideration whether you are using triangles, meshes or complete objects.
Next, the model hierarchy needs to be merged with the PiXYZ Hierarchy-Merge tool. If the models need clickable parts, this is taken into consideration beforehand. The clickable parts should be separated from the main model and not merged with it. The object part name should be the information required for the application. In this caster model, for example, the segments and the mold should be clickable, and the name of the installation places of the clicked segment should be passed to the application. The name of the part models should be the installation place.
If the clickable parts are overly complex like a segment of this caster, it is better to merge it into the main model and create clickable boxes to interact with. This will improve performance. The boxes can be created manually or automatically by creating a C# script for this. At the end, our model and its hierarchy looks like this:
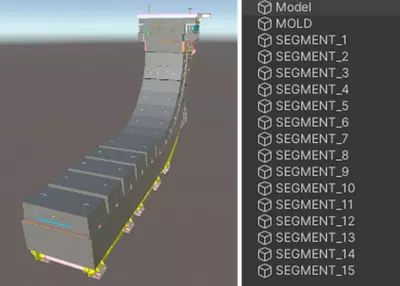
Later, the default color of the boxes is automatically changed to transparent in the application.
Since a .glb file is needed, the complete model needs to be exported from Unity in the .fbx format and then be converted to .glb, what can be done in Blender for example.
The model now looks like this and has the following properties.
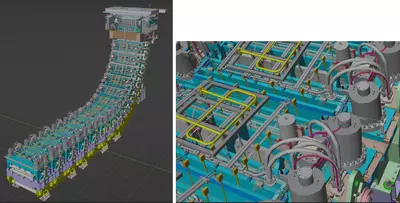
Props: 1 (+16 for the boxes) Objects, 1,257,920 triangles, 1,199,261 vertices, ~52Mb .glb file size
The properties are far smaller without losing much of the optical quality of the model.
The triangle and vertex count and thus also the file size can be significantly reduced further, not by choosing a quality level but by adjusting the target triangle value in the PiXYZ Mesh-Decimate tool. However, this can drastically change the form and the look of objects. In the following example, the triangle count was set to 100,000. The resulting .glb file size is 5MB.
Draco Compression
Given the fact that 52 MB is still a large file size for a web application, the model can be compressed using the Draco compression with NodeJS. Put the file in any directory, open the command in it, and execute:
- npm install gltf-pipeline
- npx gltf-pipeline -i yourFile.glb -o nameForCompressedFile.glb --draco.compressionLevel=x
x is the compression level (max. 10)
The final file has a size of ~4.5MB
This are examples for average file sizes for different model types:
- Caster: 4.5MB
- Mold: 494KB
- Segment: ~772KB
- Segment fixed side: ~706KB
- Segment loose side: ~792KB
React Application
The application should provide an interactive 3D model in which different installation places of a caster can be selected. For this react-three-fiber, a react renderer for three.js, should be used.
Required packages
The following packages must be installed:
npm install three
npm install three-stdlib
npm install @react-three/fiber
npm install @react-three/drei
npm install @react-three/postprocessing
npm install postprocessing
“three” installs the three.js library. “three-stdlib” provides examples for threejs, such as the DRACOLoader and GLTFLoader that are needed to load the model. “@react-three/fiber” installs the react render for three js. The “canvas” component of this is used to render the scene. "@react-three/drei" is a library that provides helpers for react-three-fiber from which the OrbitControls component is used to control the model. “@react-three/postprocessing” provides a postprocessing function for React-three-fiber. To outline hovered objects, the EffectComposer, Outline and Blendfunction components are used from this library. The required components can be imported with the following lines.
Programming the application
At first the required packages need to get imported.
import React, { useEffect, useState } from "react";
import * as THREE from "three";
import { DRACOLoader, GLTFLoader } from "three-stdlib";
import { Canvas } from "@react-three/fiber";
import { OrbitControls } from "@react-three/drei";
import { EffectComposer, Outline } from '@react-three/postprocessing'
import { BlendFunction } from 'postprocessing'
Then the path of the model needs to be specified.
const modelPath = '/caster_draco.glb'Next, materials for the interactive transparent boxes and a slightly transparent green color to highlight a selected object need to be created.
const selectMaterial = new THREE.MeshBasicMaterial({
  color: "green",
  opacity: 0.6,
  transparent: true,
});
const transparentMaterial = new THREE.MeshBasicMaterial({
  color: "transparent",
  opacity: 0.0,
  transparent: true,
});
The loader for loading and decompressing the model and a variable that stores the model then need to be initialized.
const draco = new DRACOLoader();
draco.setDecoderConfig({ type: 'js' });
draco.setDecoderPath('https://www.gstatic.com/draco/v1/decoders/');
const loader = new GLTFLoader();
loader.setDRACOLoader(draco);
var gltfObject = undefined
The react function can now be created. First, state variables are required.
  const [hovered, onHover] = useState(null)
  const [modelScene, setModelScene] = useState(undefined)
  const [clickables, setClickables] = useState(null)
  const [selectedObject, setSelectedObject] = useState("")
  const [loaded, setLoaded] = useState(false)
hovered: Specifies whether and which box is hovered
modelScene: Contains the scene that includes the 3D model without the boxes
clickables: Contains the mesh components for the clickable boxes
selectedObject: Specifies whether and which box (installationplace) is selected
loaded: Specifies whether the model is loaded.
Initially, the model is loaded and then it is stored into the gltfObject variable; loaded is set to true with an useEffect hook.
  useEffect(() => {
    loader.loadAsync(modelPath)
      .then((gltf) => {
        gltfObject = gltf;
        setLoaded(true)
      })
  }, [])
To do this, iterate through the child array of the loaded model, and if the name of the mesh is “Model”, which is the caster model, it is added to the scene variable. If the mesh name is something different, in this case the boxes named like the installation places of the caster, a mesh component for each mesh is created and pushed into the click variable, which is later used for the clickables state variable. In the material property it is checked, if it’s selected by comparing its name to the selectObject variable, if equal it gets the selectMaterial and otherwhise the transparentMaterial. The functions for hovering and selecting are also located in this component. This hook is executed if the state of selectObject or loaded is changed.
The JSX component looks like this:
<>
      <h1>{selectedObject}</h1>
      <div style={{ backgroundColor: "lightgrey", position: "absolute", top: 100, left: 0,
           width: 800, height: 550, textAlign: "center" }}>
        {loaded ?
          <Canvas onPointerMissed={() => { setSelectedObject("")}} frameloop="demand"
                  shadows={false}>
            <color attach="background" args={["lightgrey"]} />
            <ambientLight intensity={0.5} />
            <pointLight position={[10, 10, 10]} intensity={0.5} />
            <OrbitControls />
            {clickables}
            <primitive object={modelScene} scale={1} />
            <EffectComposer multisampling={8} autoClear={false}>
              <Outline blur blendFunction={BlendFunction.ALPHA} selection={hovered}
                       visibleEdgeColor="green" hiddenEdgeColor="green"
                       edgeStrength={10} edgeThickness={10} />
            </EffectComposer>
          </Canvas> :
          <h1>loading</h1>}
      </div>
    </>
The headline indicates the selected object. During loading, the text “loading” is rendered. After loading, the canvas is rendered. To deselect objects the canvas has a onPointerMissed function. The object that contains the mesh components of the clickable boxes just needs to be put into the canvas component. The scene that contains the caster model needs to be specified in the object property of the primitive component.
The final application looks like this: